Convolutional Neural Network (Single Layer, Small)
Author: Jie Wang (jiewang@cs.ucla.edu)
This is an example of small-size CNN.
The design files can be found at ${AUTOSA_ROOT}/autosa_tests/cnn.
The testing environment is summarized in the table below.
Target FPGA |
Xilinx Alveo U250 |
FPGA Synthesis Tools |
Xilinx Vivado HLS 2019.2, Xilinx Vitis 2019.2 |
CPU |
Intel(R) Xeon(R) CPU E5-2699 v3 @ 2.30GHz |
C Simulation
Run the following example command to generate one design with HLS host code.
./autosa ./autosa_tests/cnn/kernel.c \
--config=./autosa_config/autosa_config.json \
--target=autosa_hls_c \
--output-dir=./autosa.tmp/output \
--sa-sizes="{kernel[]->space_time[4];kernel[]->array_part[8,8,4,8];kernel[]->latency[4,2,4];kernel[]->simd[1,1,1,2]}" \
--simd-info=./autosa_tests/cnn/simd_info.json \
--host-serialize \
--no-reverse-order \
--hls
After compilation, you will find all generated files under the directory
${AUTOSA_ROOT}/autosa.tmp/output/src.
Copy the hls_script.tcl to the directory autosa.tmp/output.
cp ${AUTOSA_ROOT}/autosa_tests/cnn/hls_script.tcl ${AUTOSA_ROOT}/autosa.tmp/output/
Run the TCL script to perform C simulation.
cd ${AUTOSA_ROOT}/autosa.tmp/output/
vivado_hls -f hls_script.tcl
You should see Passed printed out in your terminal showing that
C simulation is performed successfully.
Bitstream Generation
If you need to generate the bitstream for on-board testing, simply remove the --hls
flag from the previous AutoSA command.
./autosa ./autosa_tests/cnn/kernel.c \
--config=./autosa_config/autosa_config.json \
--target=autosa_hls_c \
--output-dir=./autosa.tmp/output \
--sa-sizes="{kernel[]->space_time[4];kernel[]->array_part[8,8,4,8];kernel[]->latency[4,2,4];kernel[]->simd[1,1,1,2]}" \
--simd-info=./autosa_tests/cnn/simd_info.json \
--host-serialize \
--no-reverse-order
Now instead of HLS host code, an OpenCL host code is generated.
We have prepared a template Makefile for Xilinx Vitis tools.
cp ${AUTOSA_ROOT}/autosa_tests/cnn/Makefile ${AUTOSA_ROOT}/autosa.tmp/output/
cp ${AUTOSA_ROOT}/autosa_tests/cnn/connectivity.cfg ${AUTOSA_ROOT}/autosa.tmp/output/
Set the proper PLATFORM in the Makefile.
By default, we set it to xilinx_u250_xdma_201830_2.
You may notice that we also copy a file connectivity.cfg here.
This file assigns the DDR bank mapping for the design.
By default, we map pointers A, B, C to DDR bank 0, 1, 2.
Lastly, modify the MODE in the Makefile for performing different tasks.
sw_emu: C simulationhw_emu: RTL simulationhw: Bitstream generation
Note
When using Vitis flow to perform RTL simulation, nothing needs to change in the source code.
You may directly set the MODE to hw_emu and perform RTL simulation.
However, by default, we will run the kernel 10 times to collect the average runtime.
This may significantly prolong the simulation time. Consider reducing the kernel
launching times to 1 before using RTL simulation.
To generate the bitstream, set the MODE to hw and use the command below.
make all
It will take a few hours to finish. After the bitstream is generated, use the following command to run it on-board.
make check
Dataflow Exploration
Simialar to GEMM example, we provide a more detailed discussion of different dataflows for this application generated by AutoSA. T The parameters used in this program include:
o, i: output/input channel
r, c: output image row/column
p, q: kernel height/width
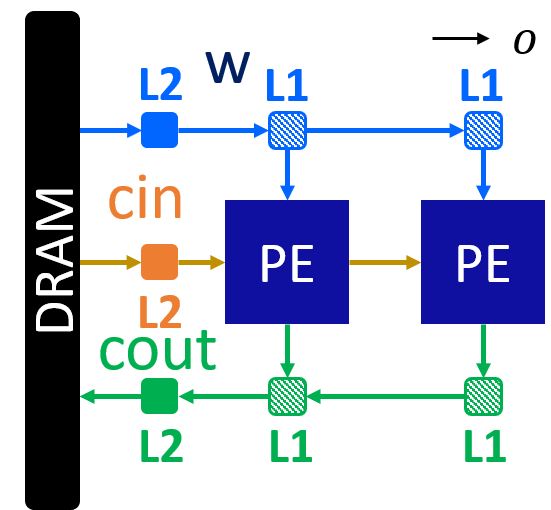
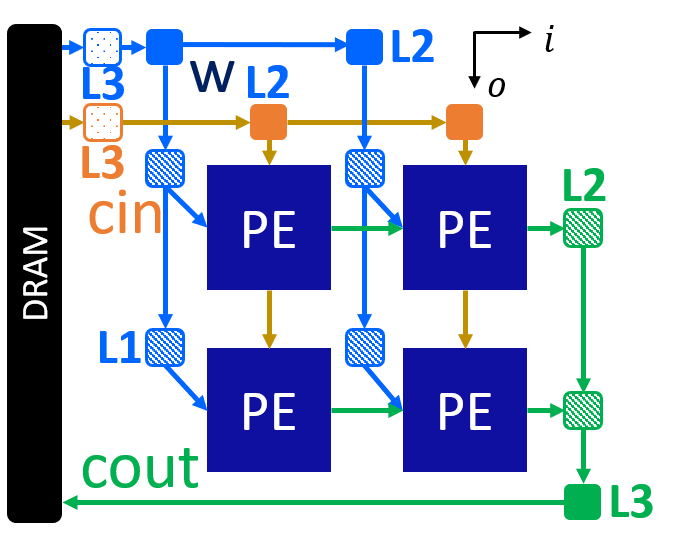
Array 1: [o]
This is an output-stationary array that chooses the loop o as the space loop. The input feature map cin is reused across PEs, weights w are sent directly to each PE. Data are computed locally and drained out from each PE.
Here is an example command for this design.
./autosa ./autosa_tests/cnn/kernel.c \
--config=./autosa_config/autosa_config.json \
--target=autosa_hls_c \
--output-dir=./autosa.tmp/output \
--sa-sizes="{kernel[]->space_time[0];kernel[]->array_part[8,4,4,8];kernel[]->latency[4,2,4];kernel[]->simd[1,1,1,2]}" \
--simd-info=./autosa_tests/cnn/simd_info.json \
--host-serialize \
--hls
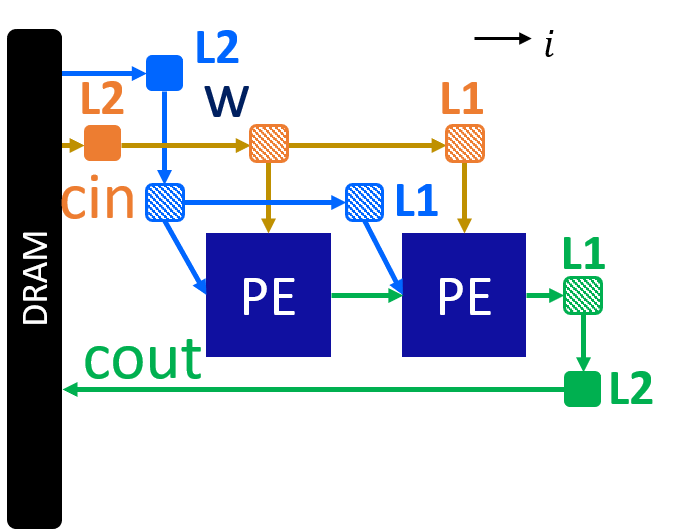
Array 2: [r]
This is an output-stationary array that chooses the loop r as the space loop. The wights w is reused across PEs, input feature maps cin are sent directly to each PE. Data are computed locally and drained out from each PE.

Here is an example command for this design.
./autosa ./autosa_tests/cnn/kernel.c \
--config=./autosa_config/autosa_config.json \
--target=autosa_hls_c \
--output-dir=./autosa.tmp/output \
--sa-sizes="{kernel[]->space_time[1];kernel[]->array_part[4,8,4,8];kernel[]->latency[2,4,2];kernel[]->simd[1,1,1,2]}" \
--simd-info=./autosa_tests/cnn/simd_info.json \
--host-serialize \
--hls
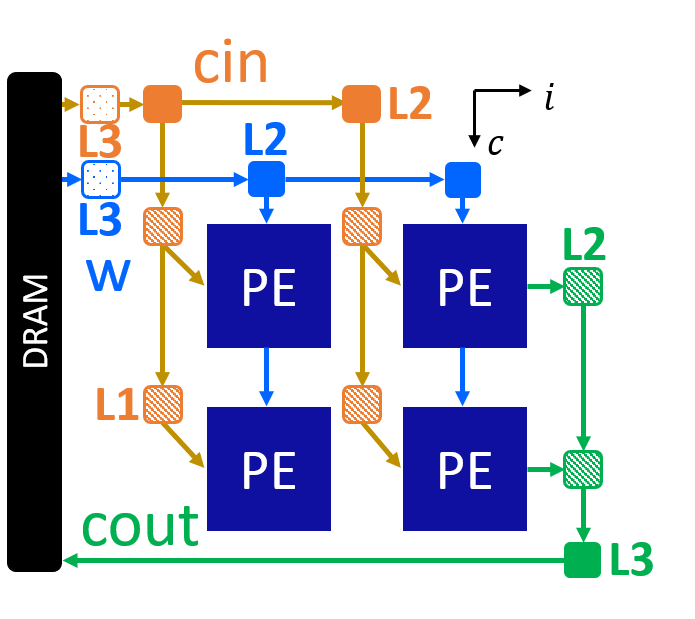
Array 3: [c]
This is an output-stationary array that chooses the loop c as the space loop. The weights and input feature maps are sent directly to each PE. Data are computed locally and drained out from each PE.

Here is an example command for this design.
./autosa ./autosa_tests/cnn/kernel.c \
--config=./autosa_config/autosa_config.json \
--target=autosa_hls_c \
--output-dir=./autosa.tmp/output \
--sa-sizes="{kernel[]->space_time[2];kernel[]->array_part[4,8,4,8];kernel[]->latency[2,4,2];kernel[]->simd[1,1,1,2]}" \
--simd-info=./autosa_tests/cnn/simd_info.json \
--host-serialize \
--hls
In this design, weights are sent directly to each PE. This is due to the reason that
AutoSA uses the data reuse along the r-axis of the weight access.
As can be found in the printed compilation information on the screen, there are two reuse
vector candidates for the weight access w[o][i][p][q].

By default, AutoSA chose the first candidate that reuse the data along the r-axis.
You may alter this choice by supplying the argument --select-rar-dep="{kernel[]->__pet_ref_4[1]}".
Here, we instruct AutoSA to select the candidate 1 for the array reference __pet_ref_4.
__pet_ref_4 is the unique ID the polyhedral front-end assigned to this reference.
Using the following command, we could generate a different array that reuses the
weights across PEs.
./autosa ./autosa_tests/cnn/kernel.c \
--config=./autosa_config/autosa_config.json \
--target=autosa_hls_c \
--output-dir=./autosa.tmp/output \
--sa-sizes="{kernel[]->space_time[2];kernel[]->array_part[4,8,4,8];kernel[]->latency[2,4,2];kernel[]->simd[1,1,1,2]}" \
--simd-info=./autosa_tests/cnn/simd_info.json \
--host-serialize \
--hls \
--select-rar-dep="{kernel[]->__pet_ref_4[1]}"

Array 4: [i]
This is an input-stationary array that chooses the loop i as the space loop. The weights and input feature maps are sent directly to each PE. Data are accumulated across PEs.
./autosa ./autosa_tests/cnn/kernel.c \
--config=./autosa_config/autosa_config.json \
--target=autosa_hls_c \
--output-dir=./autosa.tmp/output \
--sa-sizes="{kernel[]->space_time[3];kernel[]->array_part[4,8,4,4];kernel[]->latency[2,2,2];kernel[]->simd[1,1,2]}" \
--simd-info=./autosa_tests/cnn/simd_info.json \
--host-serialize \
--hls \
--local-reduce \
--reduce-op="+" \
--simd-touch-space
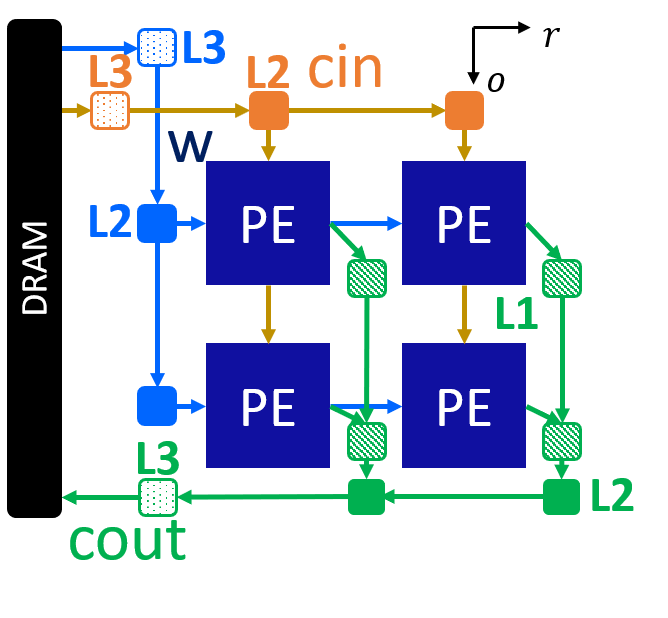
Array 5: [o,r]
This is an output-stationary array that chooses the loop o and r as the space loops. The weights are reused horizontally, and the input feature maps are reused vertically.
./autosa ./autosa_tests/cnn/kernel.c \
--config=./autosa_config/autosa_config.json \
--target=autosa_hls_c \
--output-dir=./autosa.tmp/output \
--sa-sizes="{kernel[]->space_time[4];kernel[]->array_part[8,4,4,8];kernel[]->latency[4,2,2];kernel[]->simd[1,1,1,2]}" \
--simd-info=./autosa_tests/cnn/simd_info.json \
--host-serialize \
--hls
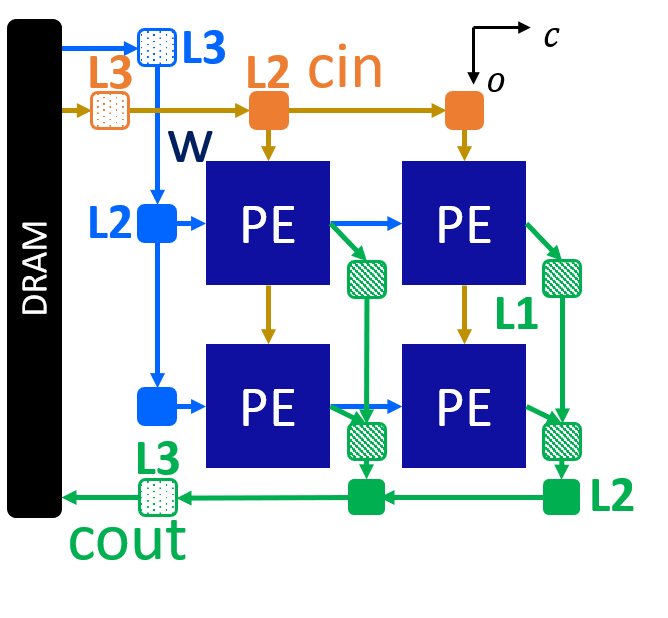
Array 6: [o,c]
This array is similar to array 5. We could also add the additional argument as array 3 to choose a better reuse vector for weights to exploit more data reuse.
./autosa ./autosa_tests/cnn/kernel.c \
--config=./autosa_config/autosa_config.json \
--target=autosa_hls_c \
--output-dir=./autosa.tmp/output \
--sa-sizes="{kernel[]->space_time[5];kernel[]->array_part[8,4,4,8];kernel[]->latency[4,2,2];kernel[]->simd[1,1,1,2]}" \
--simd-info=./autosa_tests/cnn/simd_info.json \
--host-serialize \
--hls \
--select-rar-dep="{kernel[]->__pet_ref_4[1]}"
Array 7: [o,i]
This is an input-stationary array. The input feature maps are reused vertically. Weights are directly sent to each PE.
./autosa ./autosa_tests/cnn/kernel.c \
--config=./autosa_config/autosa_config.json \
--target=autosa_hls_c \
--output-dir=./autosa.tmp/output \
--sa-sizes="{kernel[]->space_time[6];kernel[]->array_part[8,4,4,4];kernel[]->latency[2,2,4];kernel[]->simd[1,1,2]}" \
--simd-info=./autosa_tests/cnn/simd_info.json \
--host-serialize \
--hls \
--local-reduce \
--reduce-op="+" \
--simd-touch-space
Array 8: [r,c]
This is an output-stationary array. Input feature maps are directly sent to each PE. Weights are reused vertically.

./autosa ./autosa_tests/cnn/kernel.c \
--config=./autosa_config/autosa_config.json \
--target=autosa_hls_c \
--output-dir=./autosa.tmp/output \
--sa-sizes="{kernel[]->space_time[7];kernel[]->array_part[4,4,8,8];kernel[]->latency[2,2,2];kernel[]->simd[1,1,1,2]}" \
--simd-info=./autosa_tests/cnn/simd_info.json \
--host-serialize \
--hls
Array 9: [r,i]
This is an input stationary array. Weights are reused vertically. Input feature maps are sent to each PE.

./autosa ./autosa_tests/cnn/kernel.c \
--config=./autosa_config/autosa_config.json \
--target=autosa_hls_c \
--output-dir=./autosa.tmp/output \
--sa-sizes="{kernel[]->space_time[8];kernel[]->array_part[4,8,8,4];kernel[]->latency[2,2,2];kernel[]->simd[1,1,2]}" \
--simd-info=./autosa_tests/cnn/simd_info.json \
--host-serialize \
--hls \
--local-reduce \
--reduce-op="+" \
--simd-touch-space
Array 10: [c,i]
This is an input stationary array. Weights are reused vertically. Input feature maps are sent to each PE.
./autosa ./autosa_tests/cnn/kernel.c \
--config=./autosa_config/autosa_config.json \
--target=autosa_hls_c \
--output-dir=./autosa.tmp/output \
--sa-sizes="{kernel[]->space_time[9];kernel[]->array_part[4,8,8,4];kernel[]->latency[2,2,2];kernel[]->simd[1,1,2]}" \
--simd-info=./autosa_tests/cnn/simd_info.json \
--host-serialize \
--hls \
--local-reduce \
--reduce-op="+" \
--simd-touch-space \
--select-rar-dep="{kernel[]->__pet_ref_4[1]}"